SIGHT READ SONGS WITH BARRE CHORDS
This lesson is going to cover 6 different barre shapes on the guitar. These chord shapes have many applications which we’ll talk about in other lessons, but our main focus today will be combining them with the memorization of the fret names on the E and A strings to quickly play a passable version of any song.
This lesson isn’t meant to teach how to do barre chords in detail, but rather is meant to help clarify which shapes are which among the barre chords and how to use them with the fret names on the E and A strings.
If you feel pretty comfortable with your Major, minor, and Dominant 7 shapes on the E and A strings (6 shapes total), you can skip to here to learn how to use them with the fret names for this exercise.
Now let’s cover the chords:
I’m going to start with the barre chords that have their root on the E string. People usually learn these shapes as the F Major barre chord and its corresponding minor and 7 shapes.
I tend to teach these more as shapes that indicate a quality (quality meaning Major, minor, Dominant 7, etc) rather than as specific chords.
So this shape,
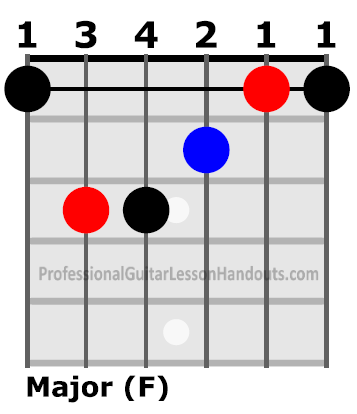
I teach as a “Movable Major Barre Chord off the E string.” The shape is a Major quality chord that can be used starting on any fret and the root of the chord is on the E string. So the chord is based “off the E string.” When it is on the 1st fret, it is F Major, which is why I have written that in parentheses, but I’m more concerned with the shape and the quality then that one specific chord location.
I relate this chord to the E Major Open Chord that most people learn as one of their first few guitar chords.
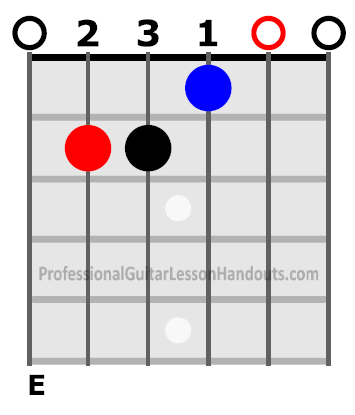
If you concentrate on the colored circles (including the open circles that indicate open strings) you’ll notice these two shapes are the same. Think of the barre as replacing the open strings as you move the E Major chord up the neck of the guitar.
Now, the following isn’t essential knowledge, so don’t stress out about it too much if you’re new to music theory; let’s talk about chord construction really quick.
Major and minor chords are composed of three notes that we refer to as a “triad” or the “1-3-5” of that note. Basically, a triad goes up the musical alphabet from your root (whatever the letter name of the chord is) and takes every other note.
For example, if the chord is A, then the 1 is A, 2 is B, 3 is C, 4 is D, 5 is E etc. The notes in that A chord then are A, C, and E. The note on the 3 and 5 might be natural, sharp, or flat, depending on the key and what the quality of the chord is, but this is a good starting place for understanding.
If the chord is F#, then the 1 is F#, 2 is G, 3 is A, 4 is B, 5 is C, etc. The notes in that F# chord then are F#, some kind of A, and some kind of C.
(For purists or the curious, technically the notes in A are A, B, C#, D, E, F#, G# and the notes in F# are F#, G#, A#, B, C#, D#, E#, but that isn’t the focus of this lesson. Simply knowing that the notes are “some kind of” C, or A, etc will go a long way to improving our understanding.)
On my chord diagram handouts, all intervals are always color coded. Black notes are always the root note, blue notes are the 3rd, red notes are the 5th, and green notes are the 7th. (My handouts also have versions that are labeled for people who are unable to differentiate between certain hues)
Let me show you the next guitar chord we need to know and then we’ll connect this knowledge to it.
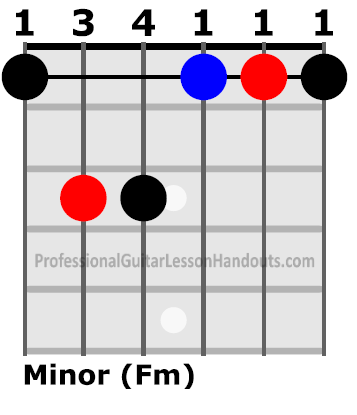
This movable chord shape is a “Movable Minor Barre Chord off the E string.” The shape is a minor quality chord that can be used starting on any fret and the root of the chord is on the E string.
Similar to the major chord, we can relate this chord to the open E minor shape.
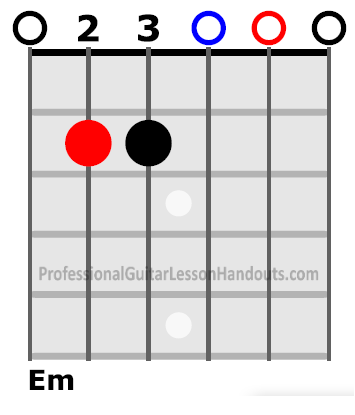
Once again, look at the colored circles (including the open circles that indicate open strings) and you’ll notice these two shapes are the same.
So we can see how these barre chords relate to the open E chords, but how do they relate to each other?
Well, both of these chords are composed of roots (the 1), thirds, and fifths. But if you compare the two shapes you’ll notice only the note on the G string changes. This note is the third and we can learn another theory concept from this.
The difference between a Major triad and a minor triad is that in a minor triad, we flat the third.
That doesn’t necessarily mean the note itself is a flat. It just means it moves down a half-step (one fret).
So if we have an A Major Triad, the notes in that chords are A – C# – E. The A minor chord is similar, but we flat the third by moving the third down a half-step. Therefore, an A Minor Triad is A – C – E.
For a different example, C major is C – E – G, so C minor is C – Eb – G.
Remember these formulas: a Major triad is (1 – 3 – 5) and a minor triad is (1 – b3 – 5).
It can also be helpful to remember that minor chords tend to sound dark, mysterious, or sad; whereas Major chords tend to sound bright, upbeat, or happy. Listen to these chords back to back, make sure you know how a Major chord sounds versus a minor chord and that you remember a minor chord has a lower note than the Major chord, this should help you keep straight which is which.
Our final barre chord shape off the E string (for today’s lesson), is the Dominant 7th chord.
A Dominant 7th chord takes the Major Triad and adds a note to it: a 7 (technically a b7). So for C7, the 1 – 3 – 5 – 7 would be C – E – G – B (technically C – E – G – Bb).
It’s important to know that the full name for this chord is Dominant 7th, but most people will just say 7. So C Dominant 7 and Ab Dominant 7 will just be written as C7 and Ab7 respectively.
The dominant 7 chord is the only one we can shorten like this. There are other 7 chords, such as the Major 7 and the minor 7, but in order to distinguish these chords from the Dominant 7 we have to say/write the whole name.
So C Major 7 will be written as CMaj7 or CM7 or sometimes C△ 7. and C minor 7 will be written as Cmin7 or Cm7 or sometimes C-7.
Now that we have an idea of what the Dominant 7th chord is, let’s focus on the important thing. How to do it:
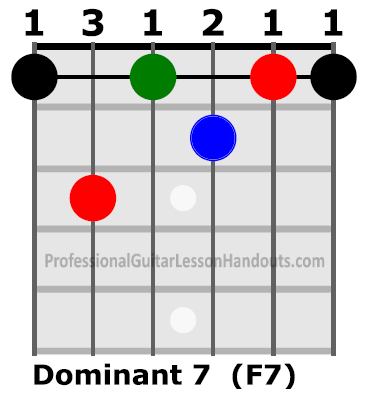
Here we have the “Movable Dominant 7 Barre Chord off the E string.” The shape is a Dominant 7 quality chord that can be used starting on any fret and the root of the chord is on the E string.
Once again, we can relate this to the open E shape, E7.
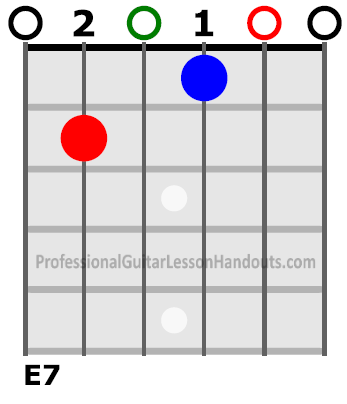
As with the other shapes, the colored circles (including the open circles that indicate open strings) maintain the same relationship to each other, indicating these are the same shape.
If you look at the chord shape and compare it to the Major shape, you’ll see that we took the root on the D string and went down two half-steps to get our b7.
We can quickly learn the other three barre shapes by applying the same logic. The same way that our “_____ barre shape off the E string” chords are related to our open E chords, the barre shapes off the E string will be related to our open A chords as you can see below.

Spend some time to memorize these chords and get them down before moving to the final step.
Now that you know the fret names from the previous lesson and the barre chords from today’s lesson, you can put them together to quickly play a version of any song you can find chords for.
For this exercise, go to any tab website such as ultimateguitar.com and pick a song (this can be random from the suggested songs at the top, or a song you like, but haven’t learned yet).
The goal of this exercise is to get quicker at reading chords so that in the future you can play a song you’ve never played before, on the spot, in a passable manner. You’ll be doing a different song every day and the point is not to learn the song right now, but to get quicker at finding frets on the fretboard and putting down the right chords instantly.
Once you’ve selected a song, find a decently rated “Chords” version of the song (as opposed to tab) and open it up. If I’m learning a song, I will usually opt for tab (particularly if there is a Guitar Pro version) since it will be more detailed, but the point here is not to learn the song, but to get better at quickly playing passable versions of songs to play with others or to sing along to.
For the first few days you try this exercise, it is better to find songs that do not have alternate tunings or capos used.
If you do use a song that is tuned down, it is important to know that the vast majority of transcribers will still notate the chords as if the guitar is in standard tuning. So for instance, if the song is tuned down a whole step, the 3rd fret of E is technically now F, but if the transcriber wants you to play a Major chord at the third fret (F Major when tuned down a whole step), it is not uncommon for them to write it as “G” since that is the chord that position is usually associated with.
Similarly, with a capo, the fret where the capo is located is treated as zero in tab and the frets are numbered/named accordingly from there as if that was the open string. So if a song has a capo at the third fret and the song has a C major in it (which could be played on a guitar without a capo as a barre at the 8th fret of E), you will usually see them write this as “A Major” since the capo is treated as the open string and 5 frets up from the open E string is A (capo at 3 + 5 frets = 8th fret of a guitar without a capo).
If that is confusing, don’t stress it right now. I encourage you to work mostly from tabs that don’t have capo or alternate tunings, or to ignore a capo instruction and just play as normal (it just won’t sound good when playing with the song that way).
Once you’ve chosen a song, scroll down to the chords and play them in order, always trying to find the closest available chord. Only use barre chords, do not use open chords except for the open E and open A chords. You can use strumming pattern that sounds right if you want, but since this is just an exercise it is ok to just strum each chord once.
Let’s say the first few chords of the song are as follows
Bm / F#7 / A / E7 /
G / D / Em /F#7
You can play B minor at the 2nd fret of the A string, using a minor shape off the A string. Our options for F#7 are then the 9th fret of A and the 2nd fret of E. The 2nd fret of E is closer, so we’ll play F#7 there with a dominant 7 shape off the E string.
The next chords are A and E7, so while we normally avoid open chord shapes for this exercise, we can use the open A and the open E7 since they share the same overall shape as the barre chord and they are closest to the 2nd fret chord we just played.
For G Major, the closest barre chord is a Major barre off the 3rd fret of E, followed by a Major barre chord off the 5th fret of A. We have another Em next, but the closest Em is now at the 7th fret of A, and finally the F#7 at the 9th fret of A.
If the chord progression repeats, you can repeat it once or twice if you want, but since the point of this exercise is to get better at sight reading chords, you can just move on to the next different part of the song (maybe the chorus or bridge) and do the same thing.
Once you’ve completed this, go back to the top, and do it again, but this time, start on the other string.
In our example, we started with a B minor on the 2nd fret of A, so this time we’ll start with a B minor on the 7th fret of E. Then we continue on from there using the closest available chord.
Sometimes you will have chords that overlap between the two versions, that is okay. We’re just trying to avoid only using one part of the guitar neck constantly, so we start the song once from each starting point.
I also generally don’t go above the 12th fret when doing this exercise.
The next time you do this exercise. Choose a different song. Remember that the point of the exercise is to quickly find chords, and if you start memorizing the song, you might start focusing on fret placement and muscle memory rather than forcing your brain to associate the note names with the frets and chord shapes.
After a week or so of doing this, you will find that you are able to navigate these much better, and with more practice you’ll be able to play the chords to any song quickly and without pause.
A couple other quick tips.
If you don’t know a chord, just play what you do know (reading from left to right) so if you see F#maj7, but you don’t know a Major 7 shape yet, just play F# Major.
If you see Csus4, just play C. If you see Dm/F#, just play D.
Long-term, it is good to learn these chords, but for now, just playing what you know will give you a passable version of the chord 95% of the time, it will just lack a little nuance.
Also, as you get better at this exercise, you can stop worrying about what chord is closest and instead think of whether the pitch of the harmony goes up or down in the song and play the corresponding chord. This will make it sound even more like the song.
In our example, if we thought the E minor that comes after D major shifted down in pitch, then instead of playing E at the 7th fret of A, we could play the open E instead. But wait until you’re good at the exercise to do this, because you don’t want to inadvertently favor some parts of the neck while neglecting others.
As you continue to improve, you can bring your open chords back into the exercise and start trying to play strumming patterns that seem to evoke the feel of the song. I may address strumming and playing what you hear in a future lesson, but for now, just do the best you can.
Finally, as you continue to improve with this, learn other movable chord shapes so you can change up your voicings and increase the number of chords you can quickly execute. I’ll cover some of these in future lessons.
In the next blog of this series, I’ll be talking about basic scales and why they are lots of fun to learn.