MEMORIZING THE FRETBOARD
Today, I wanted to showcase some of the handouts diagramming the guitar fretboard and how to use them to memorize the fretboard to the point where you can effortlessly move to the correct fret and chord whenever you need to.
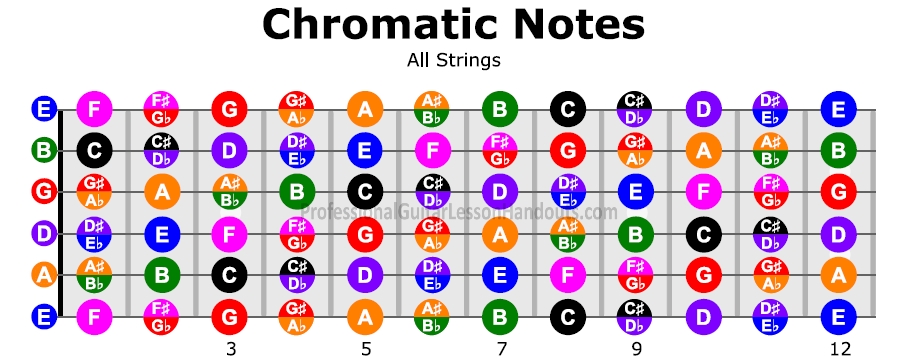
Learning the fret names of the guitar can be daunting, but we’re going to break it down into really easy chunks.
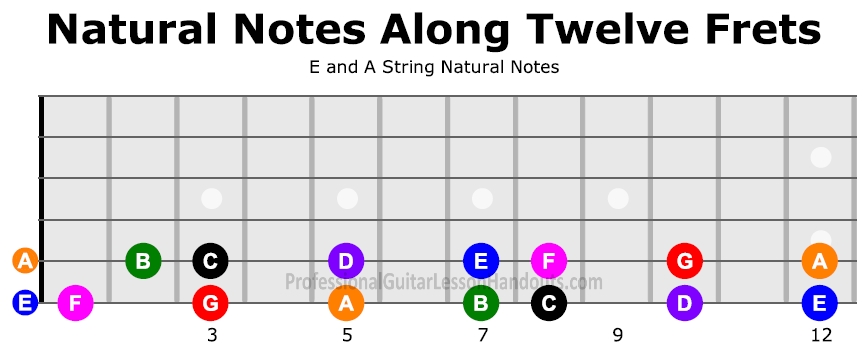
Our long-term goal is to learn the entire neck, but right now we want the biggest bang for our buck. Most people are going to get the most usage out of the notes between the 1st and 12th frets on the E and A strings.
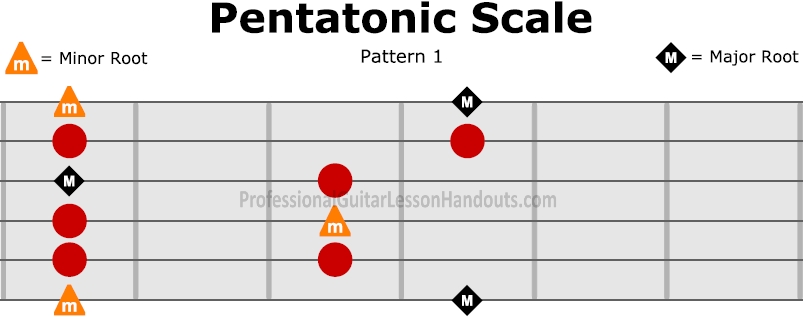
The most commonly used movable shapes, the E and A string barre chords and power chords, have their root based on the E and A strings. In addition, three of the five pentatonic scale patterns and five of the seven diatonic patterns have both their Major and minor roots on the E and A strings (the remaining two of each have either one or the other on these strings as well).
Whether you’re trying to figure out where to start your scale to play along with a jam track or you’re trying to learn the chords to your favorite song, you can easily come up with a solution for all common situations just using the E and A strings, so that’s what we’re going to focus on.
Example: Where would you start playing the above scale to jam with a track in B Major?
What fret does your barre chord need to be on if a song asks you to play F minor?
Furthermore, we’re going to only focus on the natural notes to start off with, no sharps or flats. It is pretty easy once you know the natural notes to quickly adjust up one fret for sharps (#) and down one fret for flats (b). Eventually, we want to take out even this small amount of processing, but just the natural notes will serve us well for now.
Once you know the notes on the guitar fretboard, you know them forever, so take your time. You can also use this process to learn the notes on the bass guitar since the E and A strings are the standard low strings on both instruments.
I suggest learning one note a day and spending several minutes on it despite its simplicity. I also think it’s prudent to learn them out of alphabetical order to avoid being dependent on that order. As there are seven natural notes and seven days in a week, this will create a decent level of familiarity with the notes in a week. For younger students or students with less time to practice, starting with only the E string might help.
The order I suggest is C, G, E, B, F, D, A. Students can imagine the note name printed on the fret and say the name of the fret out loud.
While it is unlikely anyone will ask you to sing the pitch without reference or to find it blindly, really listen to the sound and try to pay attention to the positioning of your hand on the fretboard to engage as many of your senses as possible in this task. If you always use your index finger for this exercise, you will have a better sense of where the notes are relative to each other.
You don’t want to just have a good sense of where the note is though, you also want it to be explicit knowledge that you know in any context.
For example someone might ask you, “Where is C on the guitar?” or you might see the chord C minor written in a song you’re learning. So you want to know that “C is the 8th fret of E. C is the 3rd fret of A” (Say this out loud several times during the process)
You might also be playing a chord on the third fret, or have someone ask you “what is the 3rd fret of A”?
So say out loud to yourself, “The 8th fret of E is C. The 3rd fret of A is C.”
Your goal is to be able to instantly answer these questions (verbally, but more importantly, physically, by putting your finger on that fret)
Doing this for several minutes for each note (and spending at least a minute reviewing previous days in the same fashion) will help the knowledge to become subconscious.
I also like to review the notes in every order I can think of. I might review them in these orders
1) The order I learned them in
2) One string at a time, in order, counting up (start at 1st fret and do every fret you’ve learned so far up to the 12th fret, day 3 on the E string would be G: 3rd fret of E, C: 8th fret of E, E: 12th fret of E)
3) One string at a time, in order, counting down (start at 12th fret and do every fret I’ve learned so far down to the 1st fret)
4) Both strings, frets 1-12 (so on day three that might be, G: 3rd fret of E, C: 3rd fret of A, E: 7th fret of A, C: 8th fret of E, G: 10th fret of A, E: 12th fret of E)
Do this for every note for a week. Remember, take your time. I know it can get repetitive very fast, but if you can bring your entire attention to this for 5-10 minutes a day or a week, a full half of the fretboard will no longer be as mysterious. (Yes, we’re working on two strings between 1-12, but since frets 13-24 are the exact same and use the same fret markers, and we have two E strings, this will give you a working knowledge of half the neck. Not too shabby for 35-70 minutes of work spread out over a week!
In the next blog of this series, I’ll go over some exercises you can use next to make sure your knowledge becomes instantaneous and make sure you know all the common barre chord shapes.