PLAYING THE BLUES SCALE ON THE GUITAR FOR FUN AND PROFIT (OF BETTER TECHNIQUE)
Today, we are going to learn a guitar scale. In addition to being a great exercise that will improve your finger independence, hand arch, alternate picking, stretches between the fingers, and many other things; it is also the basis for soloing and playing with your friends!
Many people think that jamming with other people is an advanced skill for musicians that have been playing for years. The truth is all you need is a scale and a basic progression (which we’ll talk about in later blogs).
The scale we are learning today is also the basis for a vast quantity of guitar riffs and solos, so knowing how to play it will give you an advantage when you approach these songs.
This is the pentatonic scale. The pentatonic scale is a five-note scale that is derived from the diatonic seven-note scale. The most common diatonic scale is the Major scale, which people often recognize as “do re mi fa so la ti do” which is featured in the song “Do Re Mi” in Sound of Music. To get the pentatonic scale from a diatonic scale, you take the fourth and seventh notes out (fa and ti are removed). Since these two notes often need to be played at certain times and not at others, they are the most likely to sound bad if played out of place. Their absence in the pentatonic scale enables you to improvise over simple progressions without playing any wrong notes!
Here is the A minor pentatonic guitar scale diagram:
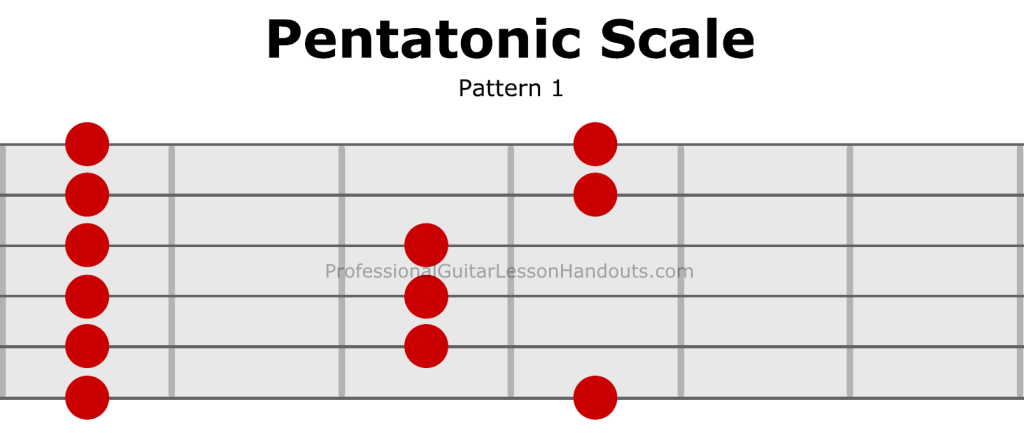
A few things to pay attention to: First, guitar scale diagrams are typically read like tab, with the low E string and A string at the bottom and the high e string at the top. It is not a mirror to your guitar. You read the pitches from left to right, bottom to top. So first, play the 5th fret of E, then the 8th fret of E. Next, play the 5th fret of A and then the 7th fret of A, and so on. But keep reading for now, because we’re going to make some small additions and clarifications.
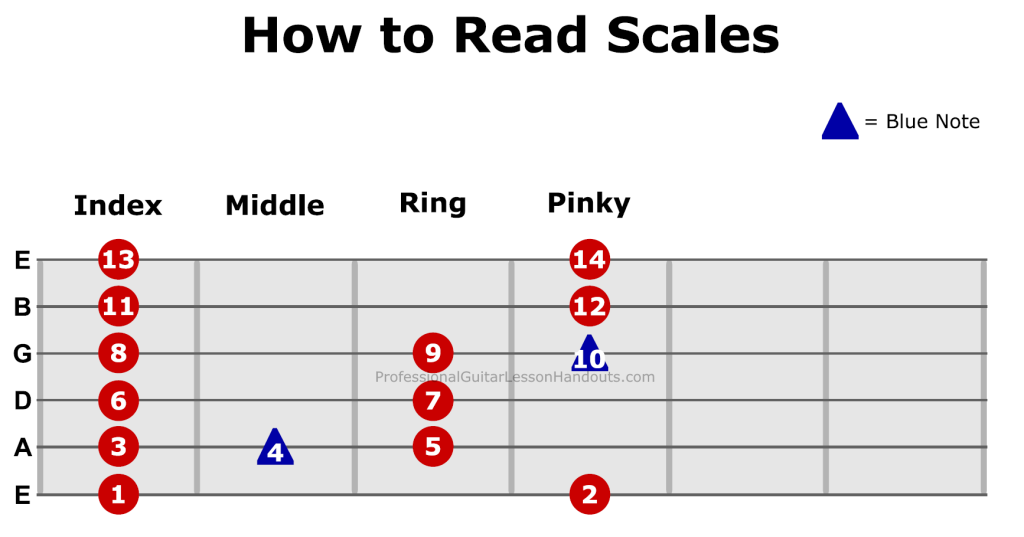
We are going to learn the scale in fifth position. On guitar, playing in position means that each finger is assigned to a fret and the number of the position is what fret you start on. In this case, the index finger will play every 5th fret, the middle finger will play every 6th fret, the ring finger will play every 7th fret, and the pinky finger will play every 8th fret.
If you were playing in first position, the index finger would play every 1st fret, the middle finger would play every 2nd fret, the ring finger would play every 3rd fret, and the pinky finger would play every 4th fret.
Most guitar scale patterns can be used starting from any fret and it will still be that quality of scale (such as major, minor and/or blues, pentatonic, etc). However, the name will change based on what fret it starts at. Since the 5th fret of the E string is the note A, this is the A minor scale. If you started at the 8th fret of the E string, which is the note C, the scale would be C minor, and so on. (Don’t worry too much about this right now if you aren’t familiar with your fret names, you can learn those here later.)
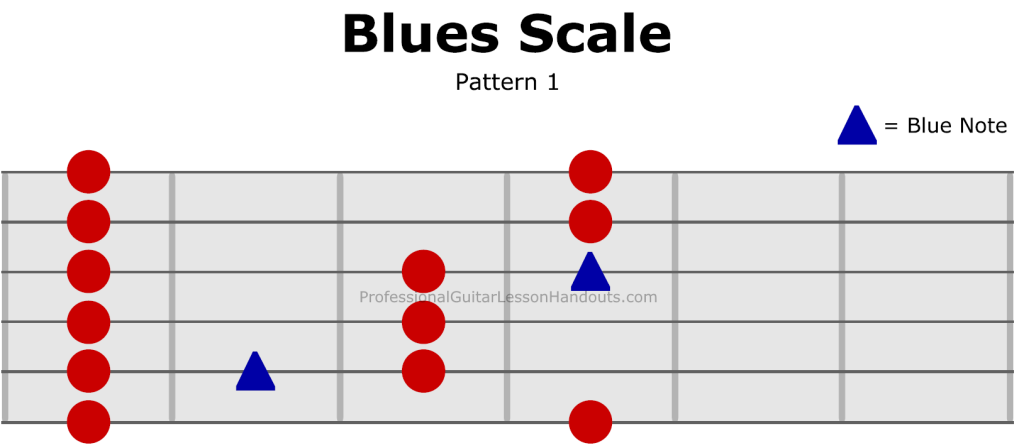
The pentatonic scale is enough to jam with other people, but you can add a little bit more flavor by adding an extra note called a “blue note” to create the “blues scale.”
The blues scale is played the same as the pentatonic scale, but with an added note at the 6th fret of A (played with the middle finger) and the 8th fret of G (played with the pinky). This note (denoted by the triangles in the following diagram) can add a little bit of flavor and contrast to the normal scale. Try it out!
If you’re still unsure how to read scale diagrams, here is a “how to read guitar scales” visual breakdown:
Make sure to memorize this pattern so that you do not need to look at it. If it helps, memorize one string at a time. (So just play E, then just play E and A, then E, A, D, etc.)
Once you have memorized the scale, be sure to play it descending as well. Here is what it looks like in tab to play the scale up and down:
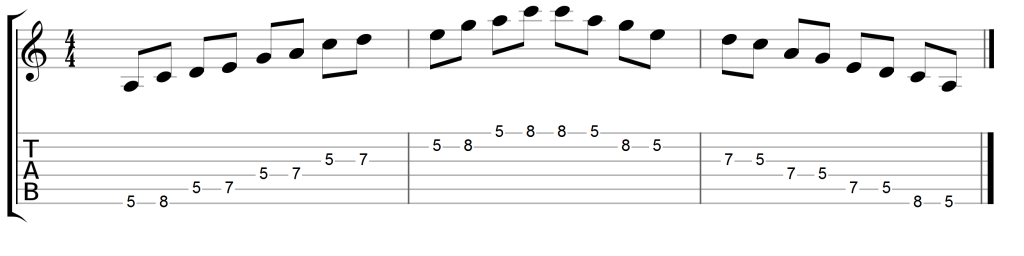
Finally, when you have mastered that, make sure to alternate your picking. You will alternate your hand the same way you would for strumming, with all number counts being downs and all +’s being ups.
If you’re already comfortable reading rhythms, here’s another rhythm you could try if you’re struggling to remember which strings have the blue note:
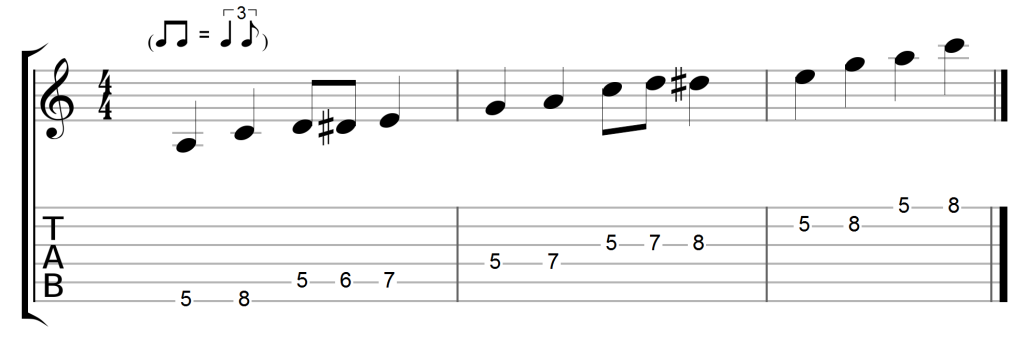
You’ll notice that in this tab example for the blues scale, I recommend using a swing feel and a rhythm of mostly quarter notes. On the two strings with three notes, I use 8th notes. When I was learning this scale many years ago, I found that this “One, Two, Three-and-Four” rhythm helped me remember which strings had the blue notes.
Once you have the scale memorized, play up the scale and back down. In addition to the rhythm above, try using straight 8th notes with alternate picking for the entire scale as well.
Remember, alternate picking is similar to strumming, where every number (1, 2, 3, 4) is played with a down and every + is played with an up. If you are playing constant 8th notes for the scale, you will always be alternating down and up. If the last note you played was an up, play a down, regardless of whether you are starting a new string or not and vice versa.
Scale Tips
Here are some tips to make your scales cleaner once you have it memorized.
As a first adjustment, when you are on the same string, leave your fingers down. For example, when you play the 5th fret of A with your index finger, leave it down and continue pressing with your index finger as you put your middle finger on the 6th fret, then leave both of them down while you put your ring finger on the 7th fret. Then you can pick up all the fingers to play the next string.
This will help you play your scales a bit more legato which means smoothly (one note leads into the next note).
Oftentimes, people have a tendency to pick up their fingers (sometimes slightly) before playing each note. This creates a staccato sound (short, detached sound where a pronounced space is present between each played note).
Keeping your fingers down will also help you develop more stretch in your hands. You should do this gradually day by day, don’t hurt your hands by overdoing it. If you feel like you can’t reach a fret you’re supposed to play while keeping your fingers down, get as close as you can and try to reach farther the next day. You can make it easier to reach the further frets by making sure your index finger is as close to the fret as possible.
Over time, try to get every finger close to the metal frets (always close to the body), so ideally your index finger should be right next to the 5th metal fret, the middle finger right next to the 6th metal fret, and so on. This will allow you to use less pressure, which helps you play faster and more relaxed. It can also help reduce buzzing.
Alternate vs Economy vs Bad Habits
Alternate picking is a great starting place for beginners because it helps you keep your rhythm and momentum, but there is another way of picking called “Economy Picking”. The idea of economy picking is that no motion is wasted. You’ll notice for example, that when playing the blues scale you play “down up down” on the A string and then “up down” on the D string, which is technically inefficient.
The transition between the strings (Down on the 8th fret of A and up on the 5th fret of D) is good alternate picking, but contains a very slight amount of wasted motion. You’ll notice that in order to play the up on D, you actually have to move your pick over the D string, and then back when you strike it.
The idea of economy picking is that in situations like this, you will pick the new string in the direction that your hand is already moving. In this case, since your hand is already moving down, you would pick the D string with a down as well. (When you are playing on a single string, economy and alternate picking will be the same thing).
However, the reason that I don’t recommend starting with economy picking is that it is much harder to keep your rhythm unless you already have a very good rhythmic sense internalized and can control your hand to reflect that. With alternate picking, if you keep the size and force of the motion consistent for your downs and ups, they should last roughly the same amount of time, giving you a very even rhythm. Economy picking can often create rushed rhythms as the hand slides from one string to the other.
It is also harder to self-moderate with economy picking in the beginning. With alternate picking, you can simple say “down up down up” out loud in order to verify that you are playing correctly. Economy picking requires that you be very careful and know exactly what you should be playing at that moment. So in general, I recommend alternate picking when you are starting out. (And for reference, myself and many other guitar players I know who can play very fast, still play using mostly alternate picking. It is common to only use economy picking for incredibly fast speeds and sweep picking)
As an aside, a lot of people have a tendency to start every new string on a down. Occasionally, this can coincide with economy or alternate picking by chance (as in measures 1 and 2 of the example below), but it can also be not economical and not alternate (as in measures 3 and 4). If you find yourself doing this, slow down and say “down up down up” out loud as you play until you break the habit.
Jamming
Scales are a useful exercise and will definitely help your dexterity a great deal. But the real reason you want to learn them is so you can create your own music! If you have a friend who knows a 12 bar blues in Am (which we’ll discuss later), or who can simply play Am, Dm, and Em with a simply strumming pattern; you can jam together!
If someone is playing a progression such Am, Dm, Em, or the blues shuffle in Am, you can play your scale along with them and it will fit. You can start by just playing up and down the scale, but over time, you can change it up and try playing the notes in the scale in different orders.
If you don’t have a friend to play with, you can go to YouTube and search for “A minor backing tracks”. Any of these tracks should be a decent backdrop for you to practice your scale and practice creating your own licks and solos.
Don’t be shy if it doesn’t sound exactly the way you want it to. There are certainly many things we can learn to improve our soloing, but a lot of people have just learned by trial and error, finding what works, so you can start there too!
Do be aware that the blue note is probably not a note you should hang out on for very long unless you are trying to create a bit of tension in your playing, we usually use this note as a quick bit of flavor as we go from note to note, or to ornament a single note. (So maybe if you’re playing the 7th fret of A, you would quickly play the 6th fret of A before going to the 5th fret of A or returning to the 7th fret.)
Jamming with backing tracks is one of the most relaxing and fun parts of playing guitar, so try it out and let me know what you think!