UNDERSTANDING ARPEGGIOS ON GUITAR: IMPROVE YOUR SOLOS AND MAKE YOUR OWN GUITAR CHORDS
Arpeggios can be a useful tool to add to your guitar repertoire, but what are the best ways to do them and why are they useful?
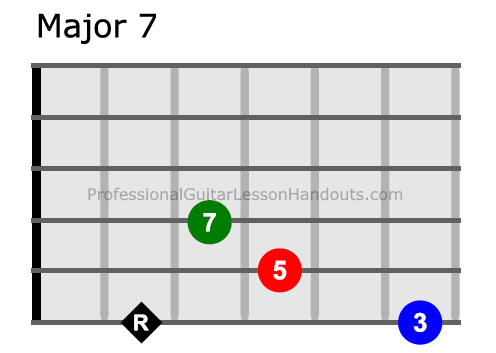
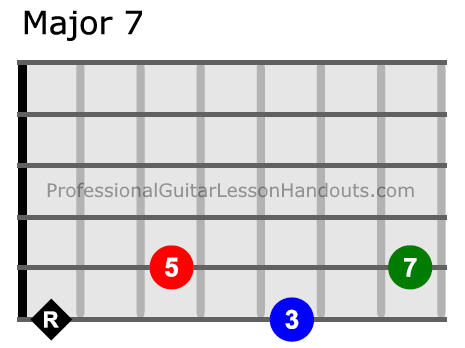
An arpeggio is the notes of a chord played one after the other. When people talk about arpeggios on the guitar, they are probably talking about specific patterns that allow you to play the notes in order from the root to the 7th. So for a Major 7 arpeggio, you would play the 1, then 3, then 5, then 7.
However, if you talk about “arpeggiating a guitar chord”, you will usually just play a chord shape you know (like the open G chord) one string at a time. You could do this from low to high, high to low, or mixed up, and it would still be common to just say you were “arpeggiating the chord” for any of those.
When we talk about arpeggios on the guitar though, we’re usually talking about the first example where we play the notes in theory order.
What is the point of learning arpeggios? There are a couple reasons that usually lead people to learn these specialized shapes.
- Understanding chords better
- Creating chords
- Hand exercises
- Improving solos
Let’s break down each of these reasons a bit.
Understanding Chords
All chords have a theoretical formula that refer to the musical intervals that make them up. For example, as stated earlier a Major 7th chord is made up of the 1, 3, 5 and 7. Another way to say this is that a Major 7th chord consists of a root, a Major 3rd, a Perfect 5th, and a Major 7th.
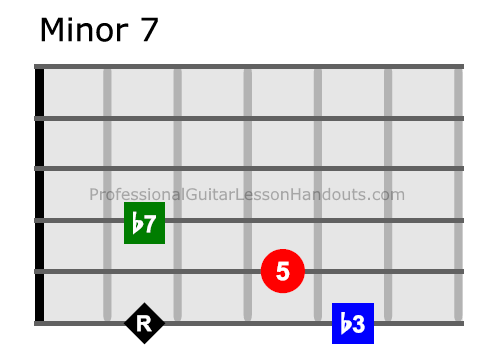
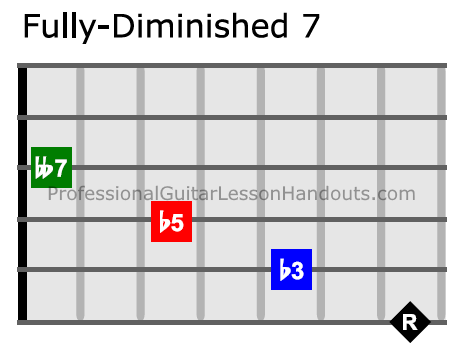
Contrast that with a minor 7th which is made up of a 1, b3, 5, and b7, or stated differently, a root, a minor 3rd, a Perfect 5th, and a minor 7th.
Learning the theory behind different guitar chords and the arpeggios that make them up is a great way to understand what makes one chord different from another. This can help you remember the name or shape of some chords better or help you to understand its function easier.
Creating Chords
Let’s say you’re playing a progression where you want to go resolve to your root chord, but when you do, you feel slightly unsatisfied. The progression resolves, but the ending isn’t as complete as you’d like or the voice-leading (the movement of notes of one chord to the notes in the next chord, such as the highest note of one chord moving to the highest note of the next chord) is not exactly what you hear in your head.
You try a different version of your root chord, but you still aren’t satisfied. At that point you can see if building a chord works better. We know that the root chord is just the 1, 3, and 5 with the option to add the 7 if we want a more nuanced chord. So any Root, 3 and 5 below can be combined to make a chord that maybe fits what you hear in your head better as long as you can fret it simultaneously (or split it between two guitars if you’re playing in a band context).
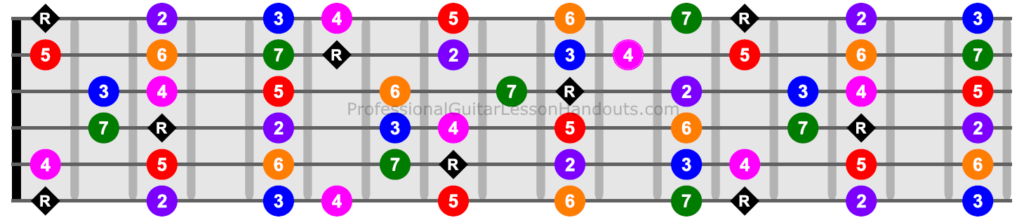
The pattern above can start at any fret, but if for the example, let’s just assume this F Major and the root on the low E is at the 1st fret. Maybe you tried a simple Major barre chord at the 1st fret and liked it, but it was a little bit fuller than you wanted, maybe the root was repeated too many times. So you tried the Major barre off the A string (at the 8th fret), but found yourself thinking it sounded too high. Check out the diagram above and look at any R, 3, and 5. Maybe we could try the 5 on the 3rd fret of A, the 3 on the 7th fret of D, the 5 on the 5th fret of G, and the Root on the 6th fret of B. This has all the same notes as our barre chord off the E string, but no repeated roots and with a slightly different timbre since we’ve moved the high notes onto thicker strings.
Hand Exercises
You can make pretty much anything on the guitar an exercise, but using arpeggios will also get some very usable shapes cemented in your hands (we’ll explore these uses in the next section), so arpeggios are a good choice if you want to try some exercises to improve your finger independence, stretching capabilities, and movement options across the neck.
Picking arpeggios that start on the E string and then transitioning to arpeggios that start on the D string (and doing the same from A string arpeggios to G string arpeggios) can be a great way to practice all of the above.
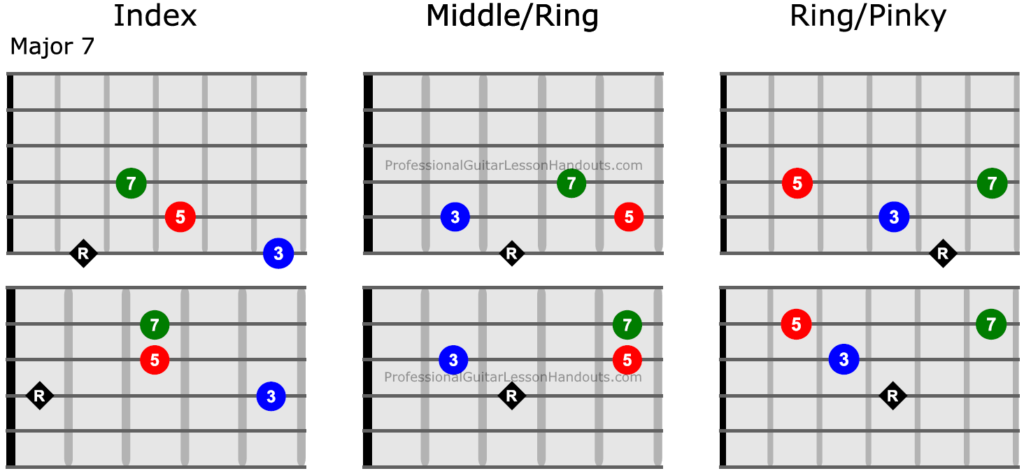
Sample image. All our guitar instructional materials use vector graphics to scale up to TV size or down to phone size without losing quality
So using the above, you might try doing the Major 7th shape off E in the middle that starts with the middle finger on the root, and transition that to the Major 7th shape off D in the bottom left that starts on the index finger. It can be a great exercise to internalize the different arpeggio shapes and the different placements of the notes relative to a given root on the E string to be able to move from any E shape to any D shape seemlessly.
For a different exercise, you could try arpeggios that go between 4 strings, or stay only on 2 strings. These shapes will help you focus both on the stretch between fingers and when to move previous fingers to the next string to keep your playing as smooth as possible.
In part two we’ll discuss the soloing and creative applications of playing arpeggios on the guitar!